Under construction
external: index
internal: preamble folders downloads screen shots Qt Creator end
![]()
Under construction
2011/10/08: Some more minor fixes, to version 0.0.5
2011/09/27: Minor fix and update of TgScenery to version 0.0.3, since TgTake2 remains stalled while I get Qt threading code exactly right...
2011-08-28: Commenced a complete re-write as TgTake2 - Under CONSTRUCTION
2011-06-09: Having just added some more to my WIN32 build of the TerraGear (TG), suite of tools - see fgfs-054.htm - I was looking for a way to automate the scenery building. In the past I have tried to do this with batch files, which is workable, but that gets quite complex. Recently I stumbled across Gijs's TerraGear GUI ;=)) This uses Nokia's Qt Creator, a cross-platform application framework, so you need to download and install this, together with the SDK to build from source.
Such a GUI alleviates getting to know each of the TG tools, and the often complex command line for each. After having assisted a little in improving this GUI, I started my own TgScenery GUI, where I could experiment with additional features, and ideas, and that is what this page is about.
In TgScenery I have tried to fully automate the download, and unzip of the required raw 'source' data, but this requires certain tools, like wget and unzip, to be available in your Windows system. A GNU WIN32 port of these unix utilities can be obtained from - http://unxutils.sourceforge.net/. Possibly other tools can be used, but without these tools much of the automation is lost...
Then TgScenery does the chopping and decoding of this 'raw' data into a form suitable for the final scenery construction - building the BTG (binary terragear files), that constitute FlightGear's scenery, using the TG suite of tools. Again you must ether download these binaries, or build them yourself for TgScenery to function.
While there is no special directory structure needed, you need to decide on directories for -
FlightGear Base Data - This is a BIG blob of data! While it continues to grow, on a recent count this is some 50,000 files, occupying some 8 GB of space. It can be cloned using Git, with the commands shown on http://gitorious.org/fg, or from an up-to-date mirror, http://mapserver.flightgear.org/git/, folder 'fgdata'. This is a BIG investment in space and time, but since it is ALSO needed for flying with FlightGear, a very necessary effort ;=((
TerraGear Executable - As indicated, this is a suite of command line tools. While my
page fgfs-054.htm offers a download of just the binaries, as always it is
recommended you build them yourself from source, obtained again from http://mapserver.flightgear.org/git/ server,
folder 'terragear-cs'. Including the aforementioned page I have several other pages on
building the TerraGear suite of tools, and more information on the FG wiki,
Building TerraGear, and
other wiki pages.
etc ...
This is my first released very of TgScenery! So it is quite MESSY, and it contains some 'experimental' things... and at present the TgTake2 re-write is NOT functional!
| Date | Link | Size | MD5 |
|---|---|---|---|
| 2011/10/08 | TgScenery-05.zip | 108,975 | c0d9f819c5601d219bac71db876a1159 |
| Older versions | |||
| 2011/09/28 | TgScenery-04.zip | 108,337 | d97b89a5539a0fcc61af2f354d71e787 |
| 2011/09/27 | TgScenery-03.zip | 108,403 | d6b78517edfa1dd98b0d27154cbd10b3 |
| 2011/06/07 | TgScenery-02.zip | 105,092 | ebf05bd19c7280a1370f91e840699183 |
| Prototypes Only - NON FUNCTIONAL | |||
| 2011/09/01 | TgTake2-0.0.2-src.zip | 85,141 | 353e6ecad4f583785aa18ba825c7b687 |
| 2011/08/30 | TgTake2-0.0.1-src.zip | 81,796 | 024c91575f35f455dec6bc5a702fea12 |
First page
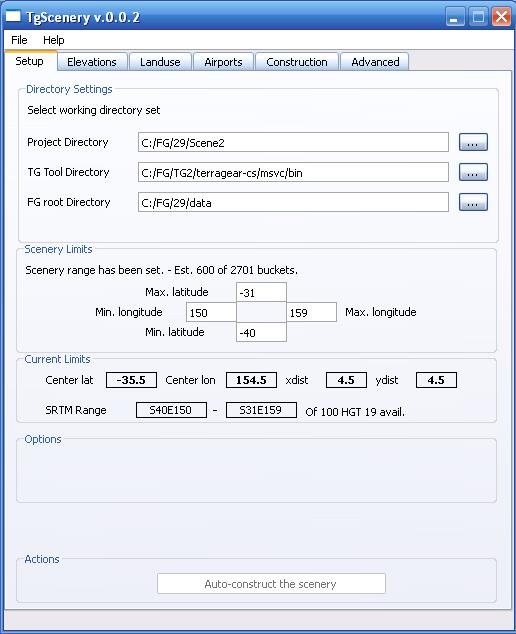
Project Directory: The first item is to establish the MAIN scenery output directory. This is where the new scenery will be built, and when completed, the this directory/Scenery would be passed to fgfs as the --fg-scenery=<dir> parameter.
TG Tool Directory: This is where the Terragear SUITE of tools has been placed.
FG Root Directory: This is where FGDATA has been downloaded to. It will contain a <FGDATA>/version file, giving the version of the data, and will have <FGDATA>/Airports/apt.dat.gz
Scenery Limits: This is where you choose the block of scenery you want to build. In this example a 10x10 degree chunk has been chosen. This can be more restricted, or much larger, but understand the bigger it gets the more processing time required... This 'scenery limit' will be applied to each of the other tab pages, but only here can it be adjusted.
Seconds page
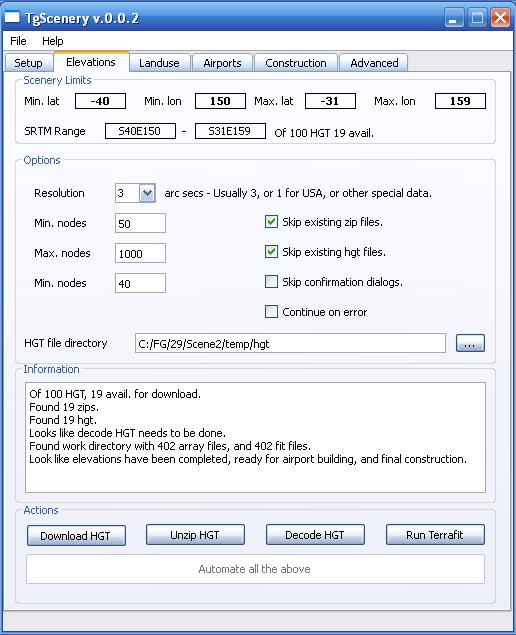
HGT file directory: Check this points to a temporary staging area. It should be the same as your Project Directory: plus /temp/hgt.
[ Download HGT ]: Download the HGT zip file
[ Unzip HGT ]: Proceed to unzip, after download.
[ Decode HGT ]: Chop the HGT files in <index>.arr.gz arrays, in the Project Directory/work/SRTM-30 folder.
[ Run Terrafit ]: Perhaps increase the Max. Nodes, default 1000, and/or reduce the Max. Errors, default 40, to produce a finer elevation mess, then run the 'terrafit' tool to generate <index>.fit.gz files from the <index>.arr.gz files.
Third page
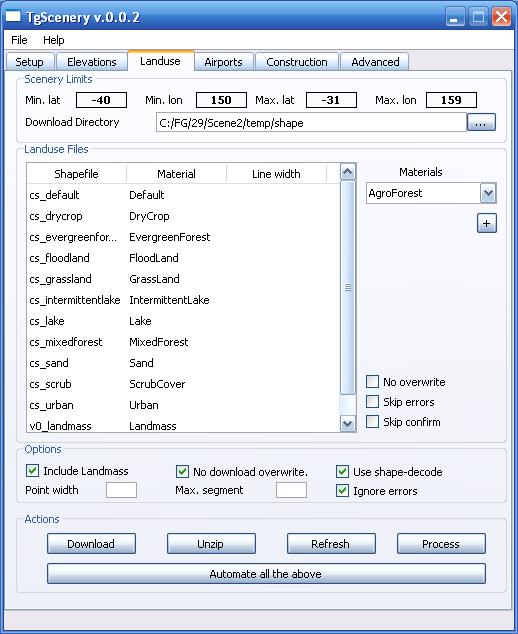
[ Download ]: Download the landuse, and landmass zip files from the mapserver site, according to the limits given.
[ Unzip ]: Unzip the landuse, and landmass zip files, breaking them into type and materials
[ Refresh ]: Refresh the land use list. This is done automatically after the unzip, so may not need to be used. Any particular land use type can be assigned a material, from the 'priorities' file. A line can be selected, then a material chosen from the dropdown, and added to the list. And a line width can be added, but an appropriate default is chosen if none given in this column.
[ Process ]: Process the shapefiles, chopping them into suitable array files, placed in a folder according to the shapefile name, and under the terragear <chunk>/<tile>/<index>.<number> format. If the ogr-decode tool is not generated on your system, then you may need to check 'Use shape-decode'. They do the same job.
WARNING: The shape file processing uses the elevations processed on the Elevation page. All land will be placed at -9999 feet if NO elevations found.
Forth page
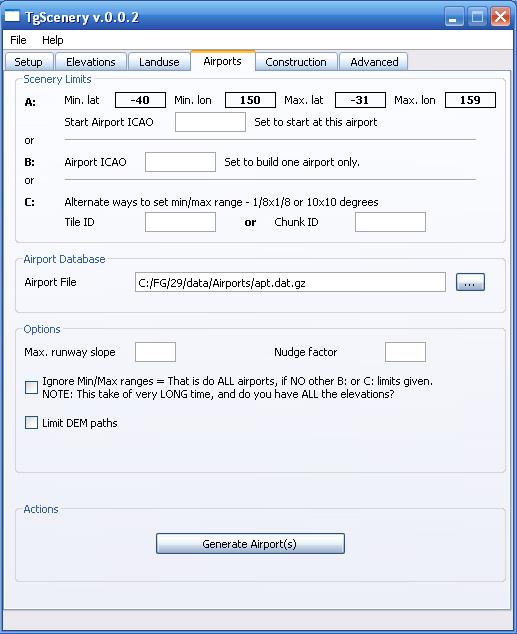
[ Airport Generation ]: In default, this will use the 'Airport File' from FG data, and will search for all airports in the chosen area, and place the results in Project Directory/work/AirportObj and AirportArea folders.
Other limits on the airport generation can be chosen.
WARNING: Airport generation uses the elevations processed on the Elevation page. All airports will be placed at sea level if NO elevations found.
Fifth page
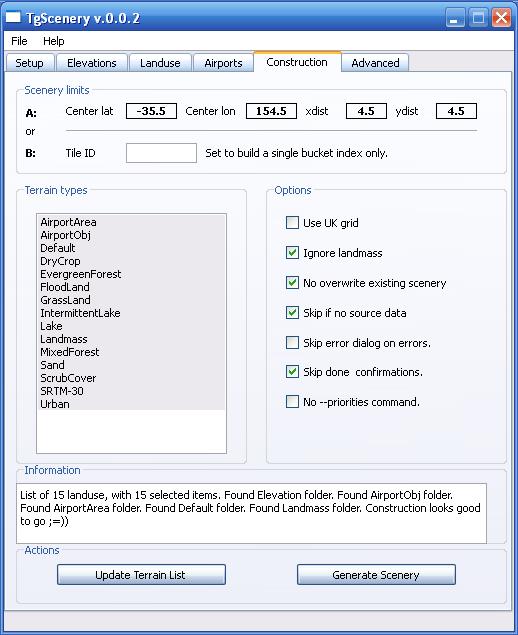
[ Update terrain List ]: This will search for folders in Project Directory/work to process, and select them all. This is done automatically when switching to this page. You can un-select any 'landuse' type you do not want processed.
[ Generate Scenery ]: The main purpose of the processing. This will put the generated output in Project Directory/scenery, which is the folder to pass to 'fgfs' with the --fg-scenery=<path> parameter. You are ready to load fgfs and 'view' your new scenery ;=))
Sixth page
Of course you have to download and install Qt Creator with the SDK... The SDK install INCLUDES Qt Creator. When installed you should have an ICON to run it on your desktop.
![]()
Double clicking this ICON should open Qt Creator, on its Welcome page -
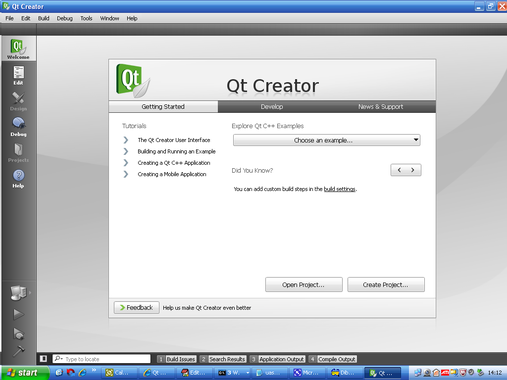
The initial load can take few seconds, or longer, so be patient, and note, in Windows, about 1 in 5 times, it can fail to fully, correctly load. This may be indicated, by the [Chooses an example...] button showing something like 'Examples not installed', or when you attempt to compile a project, it will complain that certain tools can NOT be found. Just exit, and restart the application...
Assuming you have downloaded and unzipped the above TgScenery ZIP file in some <work> folder, keeping the directory structure, this will create a TgScenery folder, and put all the sources on there.
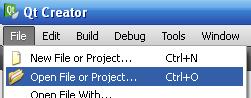
The simple action is to use the Qt Creator MENU File -> Open File or Project... (Ctrl+O). Navigate in your folders to your chosen <work>/TgScenery, and load TgScenery.pro into Qt Creator.
On the first time load, Qt Creator will ask permission to create another folder, TgScenery-build-desktop, where it will put all the intermediate build files, and the final TgScenery.exe, but you do not need to be concerned about this... I always let it put it where it defaults...
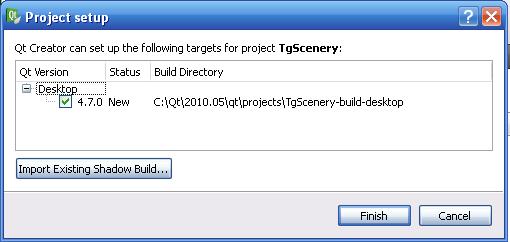
I have no experience with what 'Import Existing Shadow Build...' does, but clicking [ Finish ] will load the project.
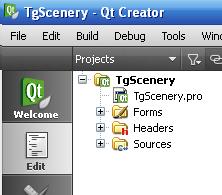
After the project loads, selecting the left [ Edit ] tab, if not already selected, will show the loaded project file list as a Tree View -
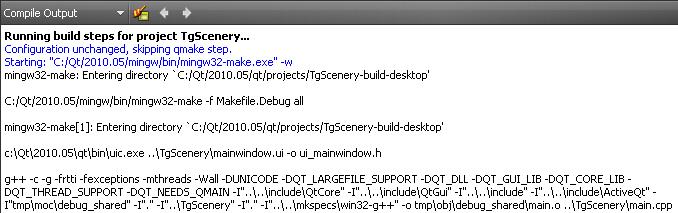
The key combination Ctrl+Shift+B will do the first build of the application. If there are no errors in the build, then you can immediately RUN the application with the F5 key. This will usually be the 'slower' Debug version, but later you can setup and use the Release version. During the compile, the bottom Compile window will show what is happening...
That is all there is to it ;=)) Load the <project>.pro file, build Ctrl+Shift+B, and run F5.
For ANY Qt project, just navigate and find the <project>.pro file, and load it. Ctrl+Shift+B will then build it, and if no errors, F5 will run it... Experimenting with some of the many examples given as part of the SDK will show you how easy this is, and you can begin to change some of the default IDE parameters to your choosing...
The binary executables built by Qt Creator have dependence on a considerable number of DLLs which are part of the SDK, thus to run the Release executable from anywhere in your system you need to get all the required DLLs in the right place. In general this means the DLLs have to be in the SAME folder as the release executable, or somewhere in a folder that is in your PATH environment variable. But this varies in different platforms...
This can take a bit of understanding to get it right, but MOST of the time I just RUN the application from within Qt Creator, which handles all this setup for me... Yes, as mentioned, perhaps in some environments it runs a little slower due to it using a larger Debug version, but what the heck... The pure CONVENIENCE of just being able to push F5 to run the application far out-weighs this (minor) speed loss ;=))
There are also various options for compiling, building applications using the command line, like using 'qmake' manually, or the QtCreator.sh shell script, but I have no experience with these, and you are on your own ;=(). But why use any of these MANUAL tools, when you have the very powerful, very complete, GUI environment, Qt Creator!
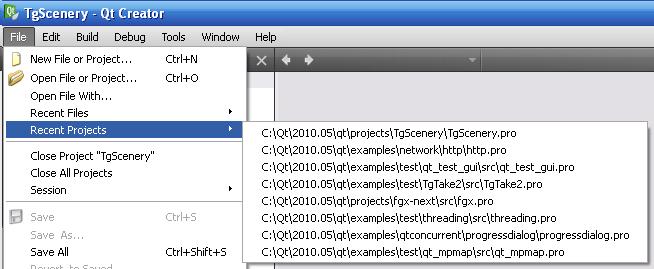
Qt Creator keeps the last 8 or so projects in a most-recently-used list, so re-loading a project is Qt Creator MENU -> File -> Recent Projects >, and choose one from the list. It also seems to support loading multiple projects in one instance, but have not learned how to manage this. Instead I will just load another instance of Qt Creator, and switch back and forth between instances...
My only complaint here is why does it only keep 8, or HOW can I increase this?
When reading, modifying the source, the default editor of Qt Creator is nicely color coded, and has many code-hint-completion features, just as you would expect from an Integrated Development Environment (IDE), and easily rivals MS Visual C/C++ IDE in that Qt Creator is fully cross platform, MS Windows, unix/linux, MAC, ...
An excellent product ;=))
![]()
Under construction
EOP - tg-05.htm